I’ve been painting warhammer miniatures for almost 20 years (lol I am old!) and am now able to paint mini’s up to a high standard. But sometimes it’s just more fun knocking out good looking models very quickly! Especially when you need to paint a lot of them 🙂

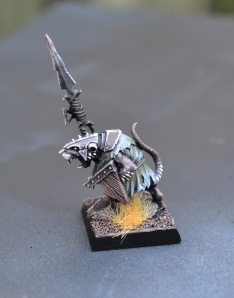
When I decided to build a Skaven army, looking at several hundred (!) models to paint, I sat down to come up with a good looking, yet incredibly simple paint scheme. The results I got turned out pretty awesome so I wanted to share them with you. I hope this tutorial helps you get inspired to paint some of your own, and maybe take away some tips to help you speed up your painting! These are the clan rats from the Island of Blood set from Games Workshop.
Batch Painting
When painting a large amount of models, there are a few things that will help you a lot:
- Use as few colors as possible
- Use as few “steps” as possible
- Paint models in “batches” not “singles”
So most of you are likely familiar with the concept of batch painting. The important thing to effectively paint large amounts of models to a good standard is to limit your amount of colors and steps, making sure to finish one “step” on all the models before moving on the the next step. By doing the same “thing” on 10 to 20 models you will become extremely fast in repeating that step, knocking out as much as 20 finished models in an afternoon’s work. I am not kidding.


Limiting your choice of colors
For my skaven clanrats I limited the used colors to:
- Dryad Bark
- Gorthor Brown
- Adeptus Battlegray
- Castellan Green
- Dheneb Stone or similar “bone/offwhite” color for eyes and teeth
In choosing my colors I made sure I could use them alternatively as “base” color as well as “highlight”. For example the clothing is alternating Castellan Green and Adeptus Battlegray, where I used the gray as highlight on the green clothes, and green as highlight on the gray clothes. This way I did not need any extra colors to add highlights, reducing the steps needed per model. If you want to choose different colors, try to see if you can limit the amount by using the same color alternatively as block and highlight color.
Step 1: Overbrush entire model
After assembling and texturing the bases, spray prime everything black. Skaven are dark so a black primer undercoat is fantastic. The first real painting step is to overbrush the entire model with Dryad Bark. Use a large brush and overbrush everything. With everything I mean everything, from the base texture, the fur, clothes, spears, metal parts and so on. Don’t flood the model with paint so make sure you drybrush. But keep the process fast, small nuances are not noticeable in large units so don’t fret if there’s small differences. Step one completed, yay! 🙂

Step 2: Paint the clothes
Start painting the clothing on the clanrats, alternatively Castellan Green and Adeptus Battlegray. Roughly try to get a 50/50 % mix of gray and green clothing between the models. I painted the clothing fully opaque, not overbrushed/drybrushed. Make sure your paint is slightly thinned down with water so you have a good flow and able to work fast. Use a large brush if possible to further speed up things. The smaller your brush tip the longer things take. With increased experience you will notice that a large brush works just as fine as a small brush (and can have a fine tip too for details) allowing you to block in colors fast.
Again, keep in mind you are “batch” painting so reapeat this painting step on all models before moving on to the next step. I like having the models thrown in containers (such as a set of soup bowls) so I can pick a model from bowl A, paint it, put it in bowl B for each “step”. It is a practical way that helps visualize your progress, churning away through the pile of models.

Step 3: Highlight the clothes
Next up is to highlight the clothes. Use a finer detail brush if this is easier for you. Use the Adeptus Battlegray to highlight the edges and raised areas of the green clothing parts. Don’t spend too much time on it, just some quick streaks already makes things pop and look good and ragged. Do the same for the gray clothing parts, only now use Castellan Green. See the pattern here? Good! 🙂 One tip: do all the green highlights at once, then go back and do all the gray highlights. This way you keep working fast without having to clean your brushes every time.

Step 4: Highlight fur, wood and base
Using a larger brush open up a pot of Gorthor Brown and gently drybrush the fur on the head, arms legs. Together with the Dryad Bark from the first step, this should give you a nice look on the rat bodies. Use the same color to highlight the edges of the base and the wooden shields, spear shafts etc. Don’t be afraid to hit some of the clothing surfaces too in the process, you don’t have to work super cleanly on these models. The Gorthor Brown layer is a bit hard to see in the photo but by this time the models should already start to look good. The color scheme is aimed to give a dark, muddy and gritty look, perfect for swarms of dank underground vermin, if you prefer the contrast to be brighter, simply swap the Gorthor Brown with a brighter color.
Step 5: Eyes, Teeth & Finish
The last step is to take Denheb Stone (or a similar bone/offwhite color) to paint the eyes and teeth with a fine brush. Additionally use a drybrush with VERY little paint to go over the armor parts, making them pop out. I also lightly brushed the fur on the lower arms and side of the heads with Dheneb Stone, and highlighted the tail a little bit.
Finish your model base with static grass or stick-on tufts and clean up the sides of your base with a color of choice. I finished this single model in just under 5 minutes! Because I don’t use washes I have zero waiting time for paint to dry and you can keep going fast.
There you go! With some practice, you should be able to knock out about 10 to 20 good looking Skaven clanrats in a good afternoon of work.
Conclusion and final thoughts…

If you want you can go back and add some more details like clan markings on the shields, or drybrush the metal parts with metallic paint. There’s no limit how far you can go with making your models look good. But since I wanted to keep my rank and file troops extremely “subdued and gritty” I chose not too, I only give my special characters some more painting detail. The goal of batch painting is to give you good looking tabletop results without busting your entire summer holiday, so I think it is best to leave out detail work until you’ve got some finished units. Its easier and more rewarding to go back later and make things “even better” than to stare at half unfinished units altogether.
Give it a try and let me know your results, love to hear your thoughts!
cheers,
Chris

Pingback: Painting Skaven Plague Monks in 5 easy steps | Echoes from the Warp
Hi, just wondering would it be better to do a wash at the end?
LikeLike
Hi Will,
You can certainly do a wash as a final step. I chose not to, because it darkens an already dark paint scheme and I like the super “matte”, subdued look I have going for my rats. Adding a wash deepens the shadows, adding contrast. But my article was intended to sprout ideas, so by all means give it your own twist!
LikeLike
Thanks for this! I just bought myself 2500 points worth of rats in one go (coming from Daemons), and were kinda itching my head when I saw the actual ammount of plastic needed to be painted, lol! With my daemons (about 5000 pts, 4000 pts painted) I’ve taken my time. Making blends, layer after layer after layer with highlights, and it looks great! But I can’t see myself ever get done with the Skaven if I’m doing it like that.
I’ve looked at some blogs, and it bolis down to either use your method, or the ‘dipping’ method. I like the ‘dry’ look of these though.
I were thinking of ways to use my airbrush, if I could save some time there. But with this tutorial that might not be necessary. Thinking I might go for some warpstone OSL though.
Cheers
LikeLike
Hi there sorry for not replying sooner, this comment got stuck in the spambox. I certainly think batch painting this way is faster than using an airbrush, although you could lay down a base color with it, spraying from the top down, leaving some black undercoat showing serving as shadows. I prefer a simply painted model over dipped any day. Even if you just use 3 colors you can already get a fantastic army on the table. I found also that if you do your bases in a consistent style, this greatly enhances your army and gives it a finished look. Most models don’t look great without the base finished. Finish all the bases and “bam” there’s your army!
LikeLike
I’d just like to say thanks.. Loved the tutorial for quick paint guide of clan rats. I’ve just bought a skaven army and have masses of clan rats to paint. So I will certainly be following this guide.
LikeLike
I’m stealing this for my Age of Sigmar Skaven. I have far, far too many to paint,
LikeLike
Hey Jimmy, please do 🙂 I know the problem
LikeLike
Awesome tutorial- thanks!
LikeLike
Fantastic tutorial! I’ve so far made roughly 150 Slaves/Clan Rats with this.
It really motivates me to keep painting more rank’n’file models, when it can be done in that short amount of time.
Thank you!
LikeLike
Simple and elegant. Just finished the first half of my clanrats and oh boy am I impressed with the result. Thanks for this tutorial, I really look forward to painting the rest of em. In my past I grew tired quickly, but this way it feels much more rewarding.
LikeLike
Thanks glad you like it!
It does help when you get a faster turnaround to keep the motivation up!
LikeLike
Ahoi, it has been some time. I got more models and even played some games with my rats. At the moment I try different techniques and want to show my results to the tutors I got the techniques from. So here I got for you my Clanrats: http://paint-claw.deviantart.com/art/Skaven-Clanrats-Drybrush-Technique-679514077?ga_submit_new=10%3A1494273092
You may ignore the shameless plug, I thought this was the best place to upload my stuff.
LikeLike
Looks great! Thanks for posting the picture 🙂
LikeLike
Lovely work, really enjoyed it and will certainly come to good use!
LikeLike